Grab yourself a brew, get comfy, this is a bit of a whopper of a post. No skimming – I’ll know if you do.
Times are hard for anyone who sells at craft fairs. People are looking, but they are buying less. As Kirsten Miller in UK Handmade recently discussed, fairs are becoming more about networking and marketing than shifting stock. To stand out, to succeed, there is far more to setting up your pitch these days than simply dumping your wares on a table. Your stall has to stand out, and it has to sell you and your business as well as your goods.
I’m no marketing expert but I’m sharing what I learned on the way to my first craft fair, some of the things I thought about when it came to designing my stall, and some of the questions I found it useful to face. Hopefully it might prove useful if you’re putting together your first stall or thinking about having a re-vamp.
Your stall has a number of jobs to do :-
- Tell potential customer who you are and what you do (Branding and Theme)
- Show what you’ve got for sale (Layout)
- Draw in potential customers, encourage them to stop and look (Design)
- Provide potential customers with the information they need to make an informed decision (Labelling)
- Instil confidence in you as a seller (Looking Professional)
Branding and Theme
Your stall is the public face of your business, what is the impression you want to make? Perhaps branding is something you’ve already thought about when designing your web pages and packaging, perhaps it’s something you’ve only recently started mulling over, even so, there will be a kernel there of how you would like you and your products to be seen.
I managed to identify a few keywords –professional, traditional, country, natural, rustic, reliable, up market, warm. What are yours? Write them out. The possibilities are of course legion – quirky, bright, modern, cheery, minimalistic, hand-made, shabby chic, dark, affordable, coastal, child-friendly, Victorian, sophisticated, industrial – you’ll know what relates to your product and your business. Keep your list honed to a half-dozen or so – you’re trying to create a coherent and relevant message.
How do you translate these keywords into something tangible like a craft stall? Fortunately there are a few tools at our disposal.
Materials
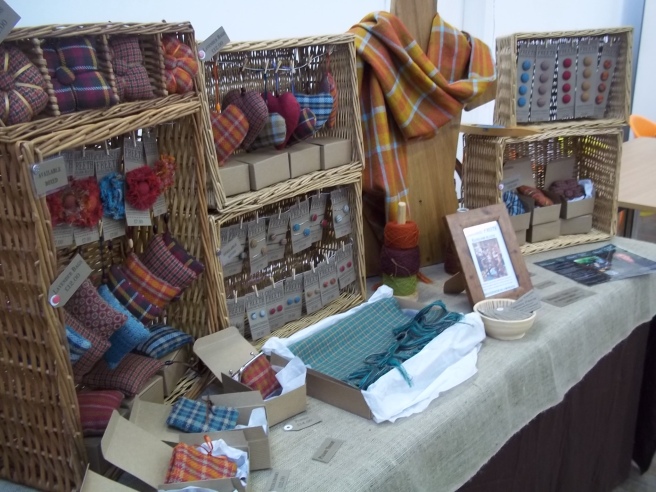
For me the use of wicker and hessian was clear; they have a traditional, rustic and natural feel as does the handmade wooden mannequin. There are only these three materials on the stall and keeping it focused forms a sense of coherence which in turn creates a professional and thought-through appearance. Look at your stand – how many different materials are there? Are you using something merely because it is at hand or because it fits in with your branding and theme?
Colour
My favourite colours are rusts, reds, mustards and browns and these tend to be the colour of the fabrics I create. The colours of the wicker, wood and hessian blend perfectly with my product and creates some warmth. Again how many colours are you using? Is it coherent? Do you want something edgy and cool (blues) something bright and child-friendly (yellows) or something a bit more minimalist or shabby chic (whites) or sophisticated (black)?
Props
Are there any props you might use to help tell the story of who you are? These don’t necessarily display your product but can say something about your theme, inspiration or how your product was made. On my stand there is generally a shuttle, a spindle with a few hand-dyed balls of yarn and a couple of cones, hinting at the original materials I use and how.
Packaging
Obviously packaging is a huge issue in its own right and I am only mentioning it here because it will be an element that will be visible on your stall and it will have to fit in with your overall design. I used a natural looking card and a traditional stamp-like font. Perhaps you prefer something crisp and white, prefer typewriter fonts, or something curly and quirky. Whatever your preferences, coherence is the key to looking professional. There is no point wanting an earthy, natural look to your stall if you go on to use a ditsy, squiggly font in your packaging. I try to make sure that the labels on my stand are consistent with the labels on my products.
As well as your brand there are more direct and obvious ways to get across the story of who you are and what you do – letting people know your name or the name of your business. Have you actually stated this nice and clearly? You’d be surprised how often this gets overlooked. I’ve got a framed sign in front of the mannequin, nothing too large because my name is also plastered on all the packaging. I know many crafters prefer a loop of bunting or large sign hanging from the front of your table, but how visible is it really, if there is a crowd in front of your stall?
At a fair you are asking your customers to pay a premium because your product is hand-crafted. This is your USP (unique selling point), make sure it is at the forefront of your stall. I personally have a bit of a problem here; when people see my fabric they assume it is normal fabric – why would it ever cross their minds that it is handwoven? So there is a picture of my loom on the table and the fact that it is handwoven is also stated on my very visible packaging. Soon I’ll add some pics using a digital frame to show the numerous stages involved in weaving. You’ll have your own way of highlighting what you do. A vintage sewing machine, a jar of brushes, cotton reels, you get the idea. If you’ve actually got some work on the go while you’re sat your stall there’s no better way than that.
It’s also essential to have your business cards very visible and easy to pick up. Having them in a nice container is useful; if you have them spread out neatly in fans might discourage people not wanting to mess it up. Again your business cards should tie in with your theme and packaging. I hand-make mine using the same card and font on the packaging. It’s that coherence thing again. I also want mine to stand out in the clutch of cards weary shoppers will unleash from their purse at the end of the day. I know some brands of business cards like Moo are very popular these days but if you are going to use them, make sure yours is still individual enough to stand out.

You might want to think about having a separate sign with your social media information on it, like your Facebook, Twitter or Pinterest names. It might be too much for the customer to remember or write down, but it could be enough for them to remember you are on Facebook and a quick search should find you once they get home. Of course having a QR code is something that can quickly solve that.
Layout and Design
Some people just aren’t interested in what you are selling, and will inevitably walk on by. Fair enough. What you don’t want is for people who might like your things not to bother; you have to draw them in. Once of the easiest ways to achieve that is to have your products at eye-level. It instantly creates interest because the customer’s eyes have nowhere else to go, they have to take it all in. If there is a crowd at your stall, building up height will also leave something of your stall to be seen over their shoulders. If everything is laid out flat on a table, the customer cannot see your goods from any distance, there’s nothing to entice them over.
You can build up the height of your stall in a number of ways, hinged picture frames, book cases, stands, boxes covered with your tablecloth, shoe racks, again the possibilities are endless and there are plenty of examples out there. Just make sure that what you build is safe and not likely to topple over onto anyone. And whilst you are after variety, think carefully about having items below table height. Do they really get looked at or are just a bit of a pain to get to and kneel in front of, and in fact only visible through people’s legs as well as a bit of a barrier to get to the table top?
There is a balance to be struck between having a stall looking like a street seller who has emptied the contents of their bag, and merely straightened things up a bit, and a jumble of everything you have ever made and everything you ever saw in a second-hand shop to put them in. You want interest, yes, but if there is too much for the eye to take in and have to work out, the customer is unlikely to bother and will just walk on. This is why some order is necessary, the customer wants to know what they are looking at instantly. Hopefully some coherence and focusing of the theme and materials will bring some natural order. But you also need to follow this through with how your products are displayed. I am a lumper-togetherer. All my different product types sit together in the same place rather than spread about everywhere. Whilst there is plenty to look at on my stall and lots to explore, it is still very ordered and very structured. It is also important to be focused about what it is you are actually selling. I also sell rag rug starter kits and they are a big seller but I would not dream of putting them on my stall of handwoven products – it confuses the customer, and dilutes what I am trying to sell.

As a species we are intrinsically attracted to balance and symmetry. Not only is this a quick fix to make your stall look attractive, but it also makes it look well-organised. Even so, you don’t want your stall to look so ordered and strict the customer is afraid of touching something for fear of messing up an immaculate display or causing an avalanche. You want them to touch and fondle, it means they’re bonding with your product, so make it easy and inviting for them to do so. This is another reason I like putting products in things, I feel folk are less worried about having a rummage through what you’ve got on offer.
Is there any coherence in the containers you use, and by that I mean anything from a set of drawers, to a basket to a print browser. Don’t use a cakestand just because you happen to have one lying about the house and saw someone else use one once. Does it actually fit in with your theme? And remember coherence in your choice of materials. If you have a bit of a medley going on, is there anything you can do to unify them, like a lick of paint or wrapping?
Another way to stop people from just passing on by, is to give them something to do. I have a simple small wooden box holding a sheaf of cards and because there is something in us that wants to see what is hidden, people inevitably have a flick through. The longer they are at your stall, the better.
Labelling
Last year I had a stall at the Makers Fair, part of the Saltaire Arts Trail. I made lovely rag rug flower brooches. I thought it would be snazzy to stick them on a skewer, make a flower shaped label, and arrange them in vases as if they were real flowers, and in a basket as if freshly cut. I barely sold any. It turned out no one knew what they were. There was a single label that said they were brooches along with the price, but people still did not twig. At a similar event later in the year I stuck each brooch onto a backing card with ‘Brooch’ written in a big font across the top and I sold loads – Spell. It. Out. You can’t always win. “Handloom Weaver” is splattered at least 30 times on my stall and I still get asked at least once where I get my fabric from. Ho hum.
But the easier you make it for your customer to know what they are looking at, the less likely they are to get disinterested and walk on. As well as a label saying what something is, display your product how it is meant to be used. If it is supposed to hang, then hang it from something. If it is a phone cover, show it with an old phone in it. If it is a pincushion, stick a pin in it. Be obvious. The customer is taking in a lot of information, it is your job to help them make sense of it and as unobtrusively as possible. Be explicit as you can about as much as you can – just because it is clear to you, it need not be for them. If something comes packaged have a box next to it and a sign saying “available boxed” (better still have the box next to it). If it comes in other colours and sizes, make sure you’ve said so. Some people are shy, others don’t want to look stupid, they don’t want to ask questions. Make sure they don’t have to. What you don’t want is them to be left floundering in their own guesswork until they give up and walk on.
Don’t be coy about putting prices on everything. You are not a gallery. If you are not comfortable with the prices you are charging, this is a bigger issue that you need to address. People are there to buy, and knowing how much something is, is rather fundamental to that process. Personally I am wary of a single price list. Why should a potential customer invest their time ferreting about on your stall trying to find out how much something is? If you can’t be bothered to make it easy for them, why should they be bothered to buy from you? What you also don’t want is for someone to see something they really like, and in those few seconds it takes for them to find the price list to have invested a piece of their heart only to discover it is too much for them, and then wander off disappointed and broken-hearted. Better for them to see instantly it is out of their budget and find one of your lovelies that is. Most of my prices are on my packaging otherwise there’s a clear label with the price right smack bang next to it.
Looking Professional
I’ve mentioned a few times about having a professional looking stall. You might say, Why do I need to bother with all this, if they like my stuff they will buy it. But many customers will simply not know who you are so why should they believe what you have on offer is well made and worth handing over their hard-earned cash? Having a professional looking stall is about instilling trust and confidence. If you’ve taken time with your stall it instantly tells the customer you’d also have also taken time designing and making your product.

If your stall also stands out from the crowd it also tells them you are an original designer, that you’re not copying someone else’s idea, they are going to buy something different and worth having. A friend of mine, Liz Samways of Inkylinky quite rightly says when people buy your product they are also buying into part of you as a designer. A carefully thought out stall tailored to you and what you do, helps the customer see straight away who you are as that designer.
A bit of a pet peeve of mine are untidy handwritten labels. I’m not against handwriting if that is part of your theme and packaging, but make sure it is neat and not just because you couldn’t be bothered to hook up the printer and take some time to find a font you liked. What else couldn’t you be bothered to do when making and designing your product?
You are an obvious and important element of your pitch and how you present yourself will have a huge impact on the success of your stall. If you sit there looking miserable and bored then potential customers will avoid you like the plague. Likewise if you are over keen, that is also a huge turn-off. And I can’t imagine anything worse than being at a stall and feeling the glare of hopeful expectation burrowing towards one’s every move.
Acknowledge your customer with a simple smile or hello, don’t force them into unwelcome chit-chat, they will move on if they feel uncomfortable. A hello and smile is enough for them to know you are there if they have a question, and entirely friendly and approachable too. If you appear to be doing something behind the scenes that takes the pressure off them, and this is why having a bit of work on the go is a real help.
I know indoor venues often have a reputation for wild fluctuations in temperature. But if you sit there in your coat, it will only look like you want to be somewhere else and that is how the customer will feel too. Suck it up, or wear layers.
Some other things to think about
Tablecloths
Make sure your tablecloth is cleaned and ironed, and the hem straight at the front (an unhappy lesson learned alas). Don’t be afraid of using colour. What is going to show off your products best? If you stick to a white tablecloth is there a risk your products will simply drown in it, instead of pop? And how many other crafters will have the same tablecloth? I saw a stall the other day full of no-doubt beautifully and meticulously made quilts but the colours were generally pastel and the quilts were lost on the white tablecloth. If it was a colour it could have made the quilts zing and drawn me in to have a look. I appreciate there is a limit to the colours available out there, so go get out your dye! And don’t be afraid of pattern, but make sure it does not clash or make a too busy eyesore. And if you take one thing away from this post, in the name of all that is holy, please, please remember to pack your tablecloths last. They are the first thing you will need to get at.

Have a practise run
Find out well in advance the size of the tables you are going to be provided with. Measure out the space on your dining table or floor and play with what you’ve got until you have it how you want it. Leave it for a few days and come back to it. Take a photograph and see if you still like it then – this is a great way to distance yourself from it. Once you’ve got it how you like it make sure you draw a plan or take photographs so you can reproduce it on the day. Don’t underestimate your ability to forget where things go in the hustle and bustle and time constraints during that setting up period. After a while you might find it useful to have a ready bank of potential configurations you can call on for typical table sizes. My stall design is quite modular so I can remove elements to make it fit on a smaller table. I also have more mannequins and clothes-horses for scarves so I can expand to fill a larger space
Using a Table
Do you need to use a table? One easy way to stand out is to use something else, book cases, dressing tables, easels, clothes-horses. There’s no rule that says you have to use a table – unless of course it is a rule – check with the event organisers.
Lights
I’ve not talked about lights as I’ve never used them. They can look effective and will help your stall look fresh and modern if that is what you are after. Many organisers will insist they are PAT tested.
Behind the Scenes
Make sure you leave enough room towards the back of the table (and ideally out of sight) for the business side of things. I generally keep:
- List of stock (so I can tick off what gets sold)
- Notebook and Pen (to write down what I sold when I couldn’t be bothered to make a list of stock, and to write down details of any new contacts I might have made)
- Cash box or something more discrete, and my float (I always use round figures for my prices to prevent hunting for change in the run up to the event)
- Receipt book
- Calculator (I have a PhD but would crumble if forced to add £7 and £5 under pressure and with people watching)
- Bags and Boxes, all ready made up
- Spare business cards for said boxes and bags
- Pre-cut tissue paper kept together with a bulldog clip
- Selotape for wrapping
- Wholesale details – cus you never know who might pop by
- A mirror, in case a customer needs it
- Flask of tea and a bottle of water, breath mints, copious amounts of grub
- Charged Camera
The list will off course depend on what you do and how you do it.
Logistics
Is your stall going to be outside? Make sure you have some clamps for the tablecloth, some plastic to quickly cover it over in case of rain, and weights to hold down anything that might blow away. Also remember how you are going to get to your events and the impact that will have on what you can pack and carry. Everything on my stall fits into a suitcase except a pair of baskets – by necessity it is very train friendly.
Lastly, if you are going to have a bowl of sweets on the table, make sure they are individually wrapped. Y’all know the thing about the bar peanuts, right? And if you have a sign-up sheet for a newsletter don’t start with an empty sheet – put at least one address on it already – people will be more willing to sign something if they think someone else already has.
Some Final Thoughts
The design of your stall will be intrinsic to you, your style, what you are selling and how you made it, but there are some general questions you can ask yourself:
- Does my stall look coherent? Is my brand coming through?
- Does everything on my stand serve a purpose and fit in with my overall theme, or am I just using it because I can?
- Does my stall stand out from the crowd? Am I memorable?
- Are there plenty of variations in height? Lots of products at eye-level? Is my stall balanced?
- Is there a reason for people to stop, will it draw them in?
- Have I explained everything?
There are boards aplenty on Pinterest devoted to craft stalls and display ideas. Invest your time in having a good look around. What do you like and why? The aim is not to copy someone else’s stall, but letting elements mull about in your brain.
At the British Craft Trade Fair the other week, everyone had the same bare shell to start with, yet no two stands ended up looking the same. These are makers at the top of their game and their creativity and individuality shone. You’re a creative person too or you wouldn’t need a craft stall in the first place. Trust what attracts you and inspires you and in your ability to come up with some original solutions. That is what will make you different and stand out.
Good luck!
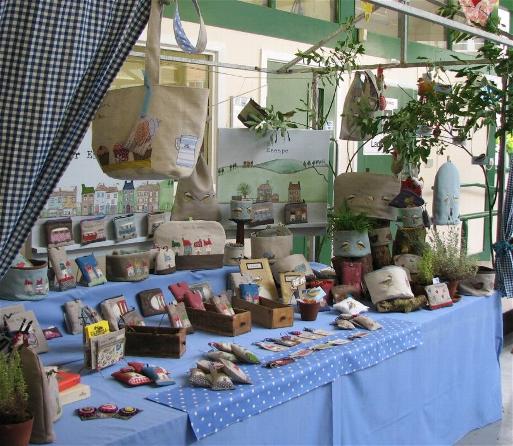
With huge thanks for the use of their images – David Worsley (Dove Street Pottery), Cathy Emmott (Dear Emma), Sarah Jones Morris (Sarah Jones-Morris Ceramics), Tracy Connell (Ruby Spirit Designs), Laura Smith (Made by Lolly)

Thank you for posting this comprehensive advice, you don’t have to be a novice to craft fairs to find plenty of food for thought in your post 🙂
Thank you for this great article. I have been puzzling how to go forward and you have enthused me. X
This was a really helpful read, in fact I have dipped in and out many times focusing on different aspect. I have my first craft event in a few weeks and I will be applying your advice. Thank you
Fantastic advice Chrissie – usually I feel depressed when I read articles about what I should be doing, but am actually quite excited about giving my stall design a revamp 🙂
I’ve done a few fairs and read a lot about how to set up a stall, but your post is the BEST thing I’ve read! Its nice to hear from a British crafter too, especially that its okay not to corner a fellow Brit into a conversation instead of just letting them browse!
Reblogged this on ..:: El-Jay ::...
Beautifully written and very informative … plenty of food for thought, love the various pix of some great examples of good stands. thank you x
I think not only is your blog for new crafters think all of us who are a bit long in tooth need to read to look at what we do in a fresh light. I no longer do craft fairs but think your advise can be used in selling our products in any retail outlet
Enjoyed reading this Chrissie and although I find my stall changes and improves each time, I plan on having a revamp and buying some more props for a big craft fair I have later on in the year… Very informative.. well done you….fellow souper Alex from Aleycrafts x
Thanks for taking the time to write this in depth info. I personally will find it very useful and it will give me confidence when planning an event.
Thanks so much Chrissie!! This really is THE definitive guide to craft stalling for our time, I shall be carrying a copy to every event I do from now on!! Loves ya pxxxxxx
What a great article. Thank you for sharing your wisdom.
This is SO well written, what a breath of fresh air and you’ve just got it all down to a tee. I take my hat off to you, such a great post, very inspiring and reassuring that it clarifies a lot of what I already felt, but words it so perfectly it’s just brought it all into focus and manageable chunks…. thank you!
I should add, it taught me lots of new things too!!!! 😛
Just wanted to say that I have been completely ovewrwhelmed by the response to this article – thank you to everyone who has read it, shared it and commented. I’m really thrilled that it has been useful x
🙂
Great article. I’m heading towards craft fair no. 5. Speaking to other stall holder, sales are slow so perhaps it is not just me!
I shall take your advice and improve my stall where I can.
Great post
Thank you for taking the time and trouble to write such an incredibly comprehensive post. I’ve found it extremely positive and helpful and also the pricing example on the previous post has really helped me start to get my head round what is a new area for me. I really appreciate this as a new seller. 🙂
Superb post! Huge thanks for time and effort 🙂
No probs – glad you liked it!
GREAT article. Thanks. Maybe you should be in marketing, some super tips.
P.s. It took me 2 mugs of coffee.
Thanks – very kind! Glad you found it useful x
Hi Chrissie thanks for the great suggestions. I am doing my first stall next week in London so am trying to get it together this week. Heading up to your neck of the woods to Whitby at the end of April for the Whitby Goth fest.
Dan
Dangdesigns
Excellent article! lot’s of good advice, some of it’s common sense but bears repeating or pointing out. I’m bookmarking it.
Glad you found it useful Kevin; thanks for taking the time to comment.
Thanks so much for your fantastic advice. I’ve just started crafting and whilst I’ve been contemplating going to a craft fair later in the year the thought has been daunting. Thanks to your fabulous article I feel ready to tackle it…well prepared!!!
Thanks so much for the feedback – makes it all worth while – good luck with your first craft fair, you’ll enjoy it and everyone will be friendly and helpful, I promise!
Thank you so much for this useful post! There are many small thing I’ve never considered, like the tablecloth clamp!
Reblogged this on All Wrapped Up.
Fabulous article. I have done fairs and sold via indie shops and my display has evolveD over time. However, I am going to try the symmetry trick and see if that has an impact on sales. Many thanks
You’re welcome Karen – good luck!
Very good tips on organising a craft stall thanks a lot for sharing
Great post, really helpful information & inspiration. Thank you 🙂
This is exactly what I needed – thanks for taking the time to put together such a comprehensive and informative post. You got my brain buzzing.
And I didn’t dare skim – I might have missed something! 😉
x Alice
Such a great post, thankyou so much for taking the time to post this. I have my first ever fair coming up and this has been such a help.
Xx
Good luck with your event!
Thank you for taking the time to share this, it was very useful and I’m hoping to put somethings into practice this weekend 🙂
This was just what I’ve been looking for so informative and really helpful thank you so much
Looking on-line for help to set up craft stall and found you! This article is without doubt the very best advice I’ve found. Many thanks for taking the time and effort to help other crafters.
I love this post! I found a lot of helpful information. I also liked the booth pictures. It really helped me to see how I can make improvements. Thanks for sharing.
Fantastic ideas … and advice! Totally relevant to a craft stall ANYWHERE in the world (you are UK …I am in New Zealand).
And it is obviously “timeless”, as this article was written 6 years ago, and is still relevant!
Thank you for taking the time to write it.